Minecraft in 360 Degrees
As both VR and Minecraft are both being talked about a lot right now I thought I might write this tutorial. Circumstances came together in just the right way such that I found myself being paid to put together a Minecraft project. The server is not really the focus of this post as much as how I put together the media for its website, including a simulated virtual reality embed.
First and foremost you’re going to need Minecraft installed with a single player version (essentially a local copy) of the world you want to take the panorama from. If you’re trying to do this with a multiplayer world you’re going to have to basically get a copy of the world files and paste them into your game directory (it should show up in the single player option). Once you have a local world with a scene you want to render a panorama from you’ll need to download Chunky to do most of the heavy lifting[1]. (Chunky requires Java and is cross-platform. Definitely note the installation and getting started guides on the Chunky home page.) If the Chunky launcher doesn’t automatically detect your Minecraft directory you’ll have to select it manually.
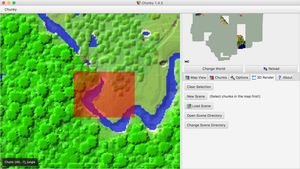
The guide doesn’t go too in-depth about how to use the Chunky interface. On the left is the scene selection map, where you select an area to render (via a set of red grid-based indicators) on a low-res top-down representation of your Minecraft world. You’ll almost always need a larger area than you expect.

To step into the scene and configure it you’ll want to go to “3D Render” then “New Scene”. A few things will happen, a set of Render Controls/Render Preview windows will open and the scene selection map will have an indicator showing the current “camera” and it’s field of vision.

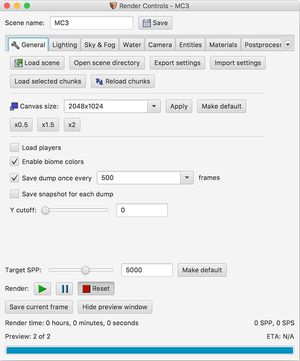
At this point you’ll probably have to edit your selection in the scene selection map and re-render it via hitting “Load selected chunks”. Any white vaguely static-like area is an empty unrendered area within the camera’s field of view. In the Render Controls window the “Camera” tab will let you fine-tune the camera’s position via the “Position & Orientation” drop-down. Note that if you’re trying to simulate a character’s viewpoint in the world you’ll have to tweak the position (Chunky will render the viewpoint you see in the preview). You can right-click in the Scene selection window to move the camera or select all visible chunks. Additionally, you may or may want to play with the settings under the “Lighting” tab. Specifically enabling “emitters” to allow anything that casts light, like lamps etc. You’ll probably be rendering a scene multiple times trying to get it right.
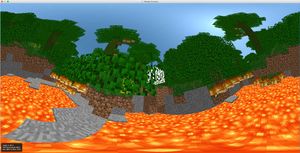
Finally, before you start the render and produce the scene there are some required settings. Under the “General” tab the “Canvas size” will need to be powers of 2 at a 2:1 aspect ratio. That will likely mean something like 2048x1024 (probably use this one) or even 4096x2048 (don’t use spaces in the “canvas size” drop-down). Under the Camera tab, the “Projection mode” needs to be “Panoramic (equirectangular)” and the “Field of view (zoom)” setting needs to be at 180. Under Position & Orientation the middle value should be -90. (The Render Preview window will change to reflect your settings.) At the bottom of any/all tabs is the “Target SPP” setting, which is essentially how much work should be done to render the scene. The higher the number the more work done and the more detailed (and likely better looking) the render. I tend to arbitrarily set mine at 5000, which takes my work laptop (MacBook Pro, 2.5 GHz i7) a little more than 3 hours depending on light sources. The play button will start the render, and you’ll see it happen in real-time in the Render Preview window.


Once you’ve rendered the image you’ll find it in the scene directory, the “General” tab has an “Open scene directory” shortcut.
There are a series of libraries we might use to usefully simulate a VR environment in a webpage[2], but my preferred method is via Google’s VR View as it works well on mobile devices and Google’s own virtual reality hardware. Google’s tutorial is mostly straight forward, but I’ll briefly reiterate the steps here.
While Google does provide the VR View JavaScript library to link to directly you’ll likely want to download and build the library yourself (which you’ll need Node.js to do) to link to locally, as some browsers have trouble with content from mixed origins. After unzipping the archive inside the folder you’ll want to run npm install and, assuming that everything installs correctly, then npm run build. The build command should assemble the files needed for the JavaScript library to construct the iframe that powers the VR View. For that reason I’d recommend you save yourself the headache and just copy the whole unzipped folder over to your hosting space (you can rename it to whatever you’d like). At this point you’ll want to include build/vrview.js in your footer, followed by a script to initialize the VR View. It should look something like:
window.addEventListener("load", onVrViewLoad);
function onVrViewLoad() {
  var vrView = new VRView.Player("#vrview", {
    image: "relative/path/to/image",
  });
}
Note that ‘#vrview’ is the id of the element we’re using as the wrapper/placeholder for the iframe in the page, so you’ll have to add something like <div id="vrview"></div> where you’d like the VR View to appear. While Google suggests the height and width parameters are required for this method I’ve never actually used them, and in fact if you want to make the embed responsive (or at least, responsive-like) you’ll have to omit them anyway[3] so you can use CSS to size the iframe directly (not the #vrview container).
I’ll note that Chunky can do much more than what we’re using it for here. There are a lot of settings, notably dealing with light, that I’m mostly ignoring. Additionally, the program is available via the command line, which means you could automate renders to create animation. I’ve also used Chunky to create faux tilt shift images of Minecraft scenes. ↩︎
Options might include Mozilla’s A-Frame, Pannellum, and Photo Sphere Viewer. ↩︎
Otherwise I believe you’d have to dynamically calculate the required dimensions and write a listener or something similar to reload the iframe on window resize. ↩︎